Planimetry and Emergency Signs
Objectives:
- Understand the school's emergency signs
- Know how to orient in an emergency
STEP BY STEP
BEFORE STARTING
The teacher prompts the class to share experiences of giving or receiving directions. Students discuss whether they had to indicate which direction to move, mention any landmarks (like streets, buildings, or parks), and whether they noted any specific signs (such as traffic lights or no-entry signs).
THE EMERGENCY PLAN
The activity begins with students examining the emergency and evacuation plan An operational tool through which the operations to be carried out in the event of an emergency must be studied and planned. It includes the route to be followed in the event of an evacuation. At school it is called the School Evacuation Plan. displayed behind the classroom door. Each student takes a turn to stand and observe, guided by the teacher. They discuss the colors they see, the images depicted, and the purpose of having the plan posted in that location, focusing particularly on the legend included in the plan.
SCHOOL MAP
Next, the teacher asks students to create a map of their school. In small groups, they will draw a map on a sheet of paper. If the school is large, they can focus on just their floor. The teacher instructs them to include the following elements in their floor plan:
- Walls, doors, and windows
- Emergency stairs, regular stairs, elevators, and emergency exits
- Bathrooms
- Offices (e.g., secretary, administration)
- Classrooms
- Common areas
- Outdoor spaces
- Gathering points
WHERE DO I GO IN AN EMERGENCY?
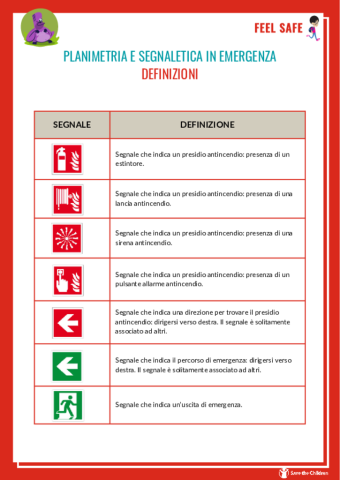
The teacher presents various emergency signs to the class and asks the groups to identify where they have seen these signs and what they believe each sign means.
TOWARDS THE RIGHT DIRECTION
Next, the class leaves the classroom (either in groups or as a single group led by the teacher) to locate emergency signs throughout their floor or the entire school. They will draw these signs on their map in the correct locations.
Upon returning to the classroom, each group writes down their interpretations of the meanings behind the signs they observed.
CONCLUDING THOUGHTS
The teacher leads a discussion on whether these emergency signs are exclusive to the school. The class collaborates to identify other places where emergency signs might be found.

Add new comment